Sunday, October 24, 2010
Is anybody listening?
Enough of the character attacks!
Tuesday, August 17, 2010
Entertainment Center Project #3
Sunday, June 27, 2010
Sunday, June 13, 2010
Bathroom Vanity
Before pics...

 Once it was laid out in CAD the doors, drawers, hardware, and laminate sheet could be ordered. The doors for this are thermo-foil laminated on MDF. These doors can be ordered in many different styles and colors and in this case it was white and there was a corresponding white laminate that matched. The drawers are custom maple dovetail drawers with vertical dividers in the large drawers and full extension slides so the drawers can be pulled out all the way. The two small drawer fronts under the sink are tip-out trays.
After pics....


As always any questions and comments are welcome.
Wednesday, May 12, 2010
Entertainment center project 2
This piece is made of cherry ply with solid cherry doors and drawers. The finish is natural (because cherry is beautiful with just a clear laquer finish).
The unit was made in two pieces (upper & lower) so it would fit in the room and it is on casters so it can be pulled away from the wall to make all the connections.
Let me know what you think and if you would like any tips or tricks as to how I went about building this. Unfortunately I wasn't able to record step by step construction due to time constraints.

Saturday, March 6, 2010
Fireplace Surround part 2

 Below are some pictures of the finished pieces. The finish used was a clear gloss polyurethane (about 3 coats).

 Final installation.
If there are any questions about the steps or methods use for this project (or any project), please feel free to send me an email and I would be happy to answer any questions.

Wednesday, March 3, 2010
Fireplace Surround
PROJECT: FIREPLACE SURROUND
This project involves the construction of an oak surround for a vent-less gas fireplace unit.
The first step is to create a measured drawing that accommodates the size and tolerances of the fireplace unit. These dimensions are usually include in the installation manual. Below is the drawing that was created. In this drawing I have excluded the trim components to show the dimensions of the cabinet only.
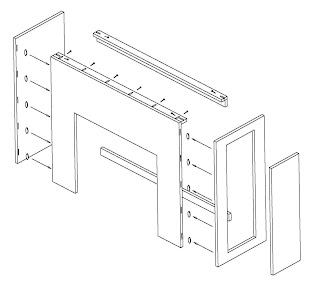
After gathering all the different materials needed I created a cut list for all the parts of the cabinet. In addition to the dimensioned drawing above I like to create a 3D model which helps me visualize the finished piece. This isn’t absolutely necessary but can be quite helpful to actually build it on the computer first in order to envision how it actually is assembled and even catch any mistakes that might have been overlooked (or cannot be seen) in the 2D drawing. The following illustrations show the full model and the cabinet exploded and how it should go together.

 These illustrate using biscuits and pocket holes. In this way we don’t have any exposed fasteners thru the face of the cabinet. You might have noticed that the side panel on the near side has a panel cut in the side. This is to create an access to the interior in order to hook up the gas and access the shut off valve. This panel will be be held in place with a magnetic catch at the top, a cleat at the bottom and trim molding. (See Below)
The cleat is beveled slightly where it catches the edge of the cut out so it can be tilted out to remove it.
Next time we will attach the pre-fabricated pilasters and trim pieces on the upper and lower sections.


